I'm just back from a lovely few days in Norfolk (now that the sun has stopped shining), which included a workshop with Magie Relph. The workshop was called Nine Patch with a Wiggle and Magie started off by telling the group of twelve members of the Dayspring Quilt Group in North Walsham that we wouldn't be using rulers...sharp intake of breath, one lady needed to sit down and another rushed for a glass of water, I went very pale.
Magie made two layers of contrasting fabric squarish, then cut them into three pieces with curved freehand cuts of her rotary cutter. More calls for cold water. Magie then showed us how to sew our curved pieces of fabric, cut them again (more freehand swings with the rotary cutter and more worried Dayspringers) and then piece the results into wiggly nine-patch blocks. She told us not to try and match any seams as they wouldn't! So we got started, helping each other and concentrating hard on matching the wiggly edges of our pieces, one stitch at a time at some points.
After doing two blocks I was starting to relax and enjoy myself, feeling very liberated by Magie's technique. She told me she thought she may have "unleased a monster"! I was not only slicing up some of my lovely Japanese fabric from Tokyo, I was even using the terrifying red fabric I've been saving for a day when inspiration and lack of fear combined. I completed twelve blocks by the end of the day and four more when I got back to the bach and then started putting them together in groups of four to make a lap quilt. I even decided to do wavy sashing and cut that without the aid of a ruler or a safety net. Hey, I don't even fancy one of those Go! cutters now! This is a photo of my blocks at the show and tell at the end of the workshop, sorry about the poor quality (of the photo, I mean).
Magie was a very good tutor and we all had a lovely day with her. She passed on her skills and techniques in a friendly way, was always encouraging and was always available to help. She brought lots of examples of her quilts with her and had brilliant handouts - always a bonus with the memory not being what it was!
and, be still my beating heart, a great selection of goodies to buy - which she didn't "push" at all, but nobody could resist!
Magie was in Norfolk for her annual Fabric Safari to Norfolk which took place in Mileham on Saturday. Our illustrious leader, Ros, has already booked her to visit Dayspringers again when she comes to Norfolk on safari next year.
Why "on safari"?
Because Magie is THE Magie Relph of The African Fabric Shop. She travels to Africa regularly, with her husband, Bob, to buy fabrics, beads, buttons and baskets and, maybe more importantly, to research and record the techniques used in creating the items she buys. She pays fair prices to the weavers, dyers, printers, bead-makers etc in Africa, supports the small communities and ensures she brings back the very best items to sell here. Here she is (centre, in turquoise) with two Dayspring quilters, look at that gorgeous indigo fabric!
Please go over to Magie's website and see more for yourself, there is a wealth of information there, including pictures of more fantastic quilts. In the meantime I'm going to take some better photographs of my wiggly blocks (I took these with my phone, not as good as my camera!) and tomorrow I'll show you what tempted me on Magie's stall.
Sunday, 6 June 2010
Tuesday, 1 June 2010
GO! up for Grabs
Right, here comes another chance to win an Accuquilt GO! cutter.GO! over to Barb'sBejeweledquilts blog and follow the very detailed instructions for a two-part giveaway. Please remember to tell her Lis sent you in the comments box - I will get extra entries if you do, but then you can blog about it and get extra entries for yourself. You've got until 10th June to do that but I'd do it as soon as you've finished reading this post - you don't want to forget now do you?!
Also, "like" the Accuquilt page on Facebook to be in their giveaways and get all the latest information.

Barb has been posting about the quilts she has been producing with her GO!, so GO! over here and here to have a look.
Monday, 31 May 2010
The Sewing
Seeing the lovely postcard on Susan's blog reminded me of this postcard, The Sewing, that I saw for sale on ebay and didn't buy. Never mind, it is lovely though.
AccuQuilt Go! Fabric Cutter - A Chance to Win
Quilters all over the world are trying to win an Accuquilt Go! Fabric cutter and one way is to sign up for their newsletter and hope you get lucky in a monthly draw (thanks to IHAN Kelly for this and other opportunities). While signing up I found their great "Are You Really A Dedicated Quilter?" and thought I'd share it with you.
Many thanks to everyone who responded to my review of the Clover Fork Pins, particularly Leeann who lives in wonderful Whangarei in NZ and wrote,
If you imagine that your seam line is drawn on the fabric. You need to pin so that pin goes in before the line, and comes out past the line. This way the place you are going to sew can't move. It looks to me in your pictures that your pins go in and come up before the seam line. This is probably why some are off. When I learned to do this my piecing improved a lot. I haven't used these pins, I just use 2 pins, one each side. They look good though, I may have to try them. :-)
No sewing for me today, I'm off to do a little gentle weeding (I usually sit on the ground to do it to make the most of my energy!) while the sun is shining here in Lincolnshire. Have a great Bank Holiday Monday (Memorial Day if you are one of my US blogging friends).
Sunday, 30 May 2010
Clover Fork Pins Review
I promised I would write reviews of the notions I bought when I was in New Zealand and I'm going to start with the Fork Pins from Clover as I have been using them quite a lot and feel qualified to judge now!
Cost
These pins are also known as "mortgage pins" because they are rather expensive. I paid for mine in Australian Dollars but I looked on the Clover website and they are priced at US$9.50, that's for 35 pins. I also checked on several UK websites and found the price varied from £5.65 to £9.89 which shows it pays to shop around.
What They Claim To Do
I was sold the pins on the promise that they would ensure very accurate piecing and all my seams would line up perfectly...
The fork pins are very fine, 0.56mm, and don't seem especially robust but they actually went through several layers of fabric easily and smoothly once I got the knack.
How I Used The Fork Pins
Match the seams together where they are to join.
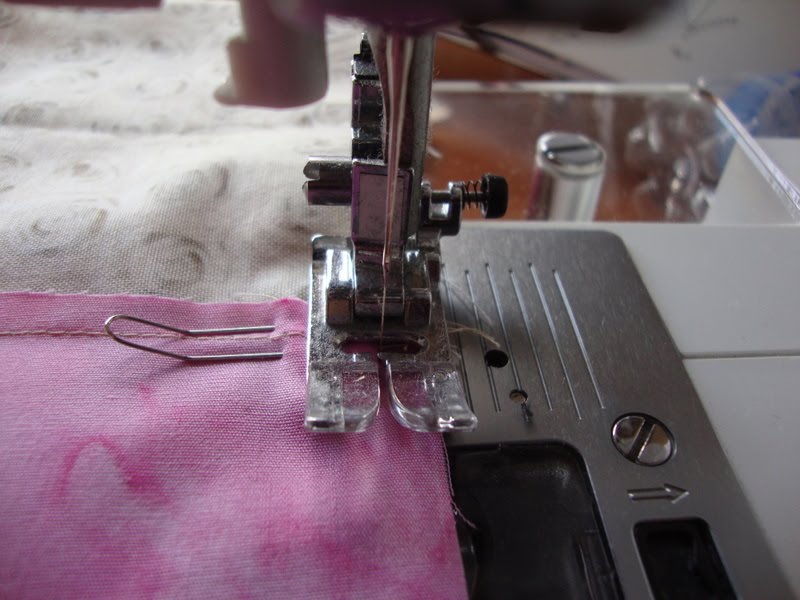
Put the fork pin through the seams with one prong either side of the stitching. This will hold the fabric securely in position for sewing, especially if the seams are pressed in opposite directions and "lock" together nicely.
I was assured that the fork pins had been designed to allow machine stitching with them in place. I found it worked well but if you are the sort of person who would NEVER do that, look away now!
My Results
So, what were my results like?
I actually had quite a lot of variation in the accuracy of my seams with these pins.
Some joins were a little way off
while some were spot on
To Buy Or Not To Buy
I now find the Clover fork pins easy and satisfying to use and I think, with further practice, my piecing will be reliably accurate (if not perfect) with their help. So I am happy that they were a worthwhile purchase and not something to delegate to the "interesting but useless gadget" cupboard!
Name the Doll - a Giveaway
My friend and neighbour and sewing buddy, Georgie, at All Things Crafty just gave me this link to a lovely giveaway so go over to http://bluebirdquilts-lyn.blogspot.com/ where Lyn is celebrating her 2nd blogiversary.
Good luck!
Good luck!
Saturday, 29 May 2010
Living Crafts in Tokyo
My Visit to Japan - 5
One of the things I did during my recent few days in Tokyo was visit the Edo Shitamachi Traditional Craft Museum. "Shitamachi" translates as down town (thank you Auberginefleur at Japan Now & Then).
Unfortunately, on the day I visited, there were no craftspeople working there (demonstrations of craftmaking by artisans take place on the ground floor every Saturday and Sunday) but I was able to enjoy the showroom of Japanese crafts which is upstairs in this building at 2-22-13 Asakusa, Taito-ku which is a 12 minute walk (or, in my case an hour and a half wander) from the Tokyo-Metro Asakusa Station and is marked on most tourist maps of the Asakusa (a -sock-sa) area. It is down a shopping arcade that looks very unlikely but if you miss it you'll come out at a large set of traffic lights on the main Kototoi Dori so just turn around a try again! Asakusa is a great area to wander aimlessly and one of the best places in Tokyo to put away your map and guidebook and just see what you find.
The museum is open daily between 10am - 8pm and admission is free. There is also a self-selection video player where you can watch films of craftspeople at work. I enjoyed seeing a video of some very detailed glass cutting but of course the commentary was in Japanese.
The Edo Shitamachi Traditional Crafts Museum displays traditional crafts from a wide variety of materials using skills and techniques developed from the old Edo period. The gallery was opened to preserve and popularize traditional crafts while promoting them as a viable industry. There are approximately 400 items on display from fifty different craft disciplines. These include work in tortoiseshell, lacquerwork, knives, fans, lanterns, brushes, gold leaf work, detailed wooden furniture, and paintings. You cannot buy directly from the museum but the staff are able to direct you appropriate artisans if you are interested and there are leaflets available (in English) giving some information about the crafts and craftspeople.
Wednesday, 26 May 2010
I Have Been Sewing Too
I was looking at this blog and it doesn't appear that I've done much sewing recently! I seem to have posted about other things. So here are a couple of pictures of what I have been doing.
I'm working on a sampler quilt from Lynne Edwards' book and have just four more blocks to go before I can start arranging them, adding block borders, sashing, quilt borders...and I also have to decide whether I'm going to quilt as I go - which is what I'm considering.
I've been looking at a couple of posts Leah Day did a while back about quilting a sampler quilt and they are inspiring me and filling me with terror too!
Also, some lovely visitors to the Blogger's Quilt Festival have commented that they would like to see some close up images of the detail of my wallhanging so I've added some pictures to my BQF post here.
Tuesday, 25 May 2010
Lincolnshire Lunch
You may (or may not) remember from a post here in April that I met up with a fellow blogger when I visited New Zealand. Well today, Debbie, and her husband, Ian, came to lunch with us here in Lincolnshire. It was lovely to see them both again and only sad that they didn't have time to stay longer and that I forgot to get my camera out. We had a great catch up and chat - Debbie's been to the quilt exhibition at the V&A museum while they've been in England and she dropped some tantalising titbits about what there was to see and the good advice to get the headset guide when I go in June. We fed them with some real Lincolnshire delicacies: pork pie, stuffed chine, haslet, Lincolnshire Poacher cheese and Lincolnshire Plum loaf. The cheese (eaten with the plum loaf) and the pork pie were particular hits! If you'd like to try the chine or haslet, here are some recipes:
Lincolnshire Haslet
Serves 6-8
675g (1½lb) Lean Minced Pork
110g (4oz) Slightly Stale Bread
1 Medium Onion, finely minced
Caul Fat
Pinch Ground Dried Sage
Salt and Pepper
Pre-heat oven to 170°C: 325°F: Gas 3.
Soak the bread in water for 30-45 minutes.
Squeeze bread, removing as much water as possible.
Mix with the minced pork, add the sage and season to taste.
Mould into a loaf shape, wrap with the caul.
Place on a baking tray.
Bake for 60 minutes.
Stuffed Chine
This superb Lincolnshire dish of salt pork filled with herbs is known as stuffed chine. Verlaine, in the mid-1870s, spent a year as a schoolmaster just north of Boston. He liked chine so much that he tried to find it elsewhere in England, but without success. Verlaine's chine was stuffed with leeks, spring onions, lettuce, raspberry leaves, parsley, thyme and marjoram. Nowadays parsley suffices, but you will need a great deal.
Ingredients
Serves: 6-8
1 Chine of pork
large bunch Fresh parsley
1 Chine of pork
large bunch Fresh parsley
Method
Take a careful look at your piece of meat. One side will be bordered with fat, the other will show the backbone. Turn the fat towards you, the bone away, with the lean side uppermost. Leaving a border of meat, make a deep slash from fat to bone (not to the edge of the joint but to the fat at the edges, leaving a pocket for the stuffing). You will not go through, as there is the unseen barrier of the vertebrae wings of bone.
Repeat, make five slashes in all. Turn over and do the same the other side. Soak the meat for 24 hours.
Meanwhile prepare an enormous chopping of parsley, and other greenery if you like. Use a processor, but do not reduce to a soup. A moist hash is easier to stuff than a coarsely chopped dry pile of parsley. Cram as much as you can into the slashes.
Tie the chine tightly into a cloth. Put into a pan, cover with cold water, and simmer for four hours. Change the water as it becomes salty. Cool in the water for two or three hours, remove, drain and press under a weight, with the meat still in its cloth.
To serve, unwrap the chine, and slice it form the fat end, parallel to the fat. The slices tend to fall apart, but reassemble them on the plate. In Lincolnshire you eat stuffed chine with vinegar.
Monday, 24 May 2010
Kimono
My Visit to Japan - 4
I was delighted to find that a lot of ladies in Tokyo wear kimono, maybe not every day but certainly not only on high days and holidays. I tried to take some photographs without being intrusive, sometimes with less success than at other times. This photo above was my first attempt. I was delighted to see the two young ladies but not very quick with my camera and only just caught them as they went off down the road.
At the Nezu Shrine there were ladies dressed in kimono for part of the festivities but I caught them "backstage"
and near the shrine there was a shop selling new and used kimono which these ladies were considering to add to their collections:
I love this photograph and the way it shows the traditional and the modern sides of Japan. The lady in her beautiful kimono is using her mobile phone while she waits for the metro train. I hope she wouldn't mind that I took her photo but after that I decided to stop sneaking around behind my camera.
I attended a shamisen (three-stringed instrument) concert where lots of the performers and the audience were in kimono
and there were two beautiful ladies in full geisha kimono dancing and singing
and so I approached one lady and asked if she minded if I took her photograph. Not only did she not mind but she explained that her kimono was decorated with Japanese theatrical masks.
Doesn't she look elegant? She then suggested that we have our photo taken together - hmm, I don't look quite as elegant!
My first post on this blog was about a Quilters' Guild Area Day that I attended in Fleggburgh, Norfolk when Jenni Dobson was the guest speaker. At that meeting Jenni gave a "live insight" into the kimono which was spellbinding and incredibly instructive.
Kimono literally translates as garment and is worn as a series of layers and ties, all with particular significance. Now that Japan has become more westernised kimono are more often worn for festive occasions, to visit shrines and for weddings. I suppose that's in a similar way to the Scots wearing their traditional kilts.
Kimono are made of fabric 13-14" wide and approximately 15 yards long. Kimono are unstitched to be cleaned and to be stored and the Japanese show "respect for the selvedges" - no material is actually cut away during the making and as they are often passed on they can be made larger for the next wearer if necessary. The Japanese also believe that any element used to make the kimono becomes part of the garment and should not be taken away - so any tacking will be found remaining in the finished garment.
I recently found a poignant post about the discoveries made when taking a kimono apart, you can read it on Heather's blog.
It was wonderful on that occasion in Norfolk to have the opportunity to examine some kimono at close quarters and see how they had been stitched. It was even more wonderful to be in Japan and see kimono being worn.
Jenni Dobson recommended "The Story of the Kimono" by Jill Liddell for anyone wishing to learn even more and I have finally tracked down a copy (it's out of print and ridiculous prices are asked for it on the various book seller sites I've tried previously) which is on the way from America at this very moment. I look forward to sharing it with you when it arrives. In the meantime there's a great website with loads of information about kimono that you might like to look at, it's www.japanesekimono.com
Subscribe to:
Posts (Atom)