Each month this year members of Global Piecers are sharing a favourite technique as a tutorial, with the aim of creating a mini sampler quilt or table topper with blocks of all the different techniques. I'm sharing my tutorial here, which is on wavy seams.
I've posted about wavy seams before, when I did a workshop with Jenni Dobson in 2009 and when I did a workshop with Magie Relph in 2010. Have a look at those posts:
wavy seams tutorial
wavy four patch tutorial
I have also found these interesting posts about wavy seams which give ideas about using them in various ways:
http://www.redpepperquilts.com/2014/05/tutorial-cutting-and-sewing-free-hand-curves.html
http://www.pinkchalkstudio.com/blog/tutorials/tutorial-wavy-seams/
and finally a youtube tutorial which shows how to make a block with wavy seams.
https://www.youtube.com/watch?v=8q0lI3-cyXY
The idea of my tutorial is that you learn this technique and then use it in a way that suits you and your project. You might decide to make a wavy seams block, maybe the wavy four patch that I did with Magie Relph. I also thought it might be fun to use wavy seams to piece small pieces of fabric and create the border for your finished project, or the backing. The possibilities are limitless, just have fun.
I also promised to share a pattern for a foundation pieced pineapple block. If you had fun with Sal's tutorial on foundation(paper) piecing last month then you will enjoy creating a pineapple block. Here's a traditional way of doing it:
http://www.quilterscache.com/P/Pineapple2Block.html
While looking for this pattern I discovered another site which I am including here because although their pattern is for a smaller block (6" or 8") they do include lots of different ways of using the pineapple block to create stunning designs.
http://www.generations-quilt-patterns.com/pineapple-quilt-pattern.html
And if you do fancy pineapple but not foundation piecing, try this method by Karin Hellaby:
http://piecenpeace.blogspot.co.uk/2010/08/karin-hellaby-creates-pineapple-blocks.html
This is the first pineapple block I made, I used the pattern in Lynne Edwards' sampler book. I'm looking forward to seeing what you all do with your wavy seams and whether you tackle a pineapple. My tip for the pineapple block is to check the positioning of each piece of fabric before you stitch it, it is easy to end up with wonky pieces and gaps in your seams - hold the work up to the light to position the piece of fabric you are adding. My tip for the wavy seams is to abandon the ruler and even the pins if you're confident enough, and have loads of fun. Happy stitching Global Piecers.
Showing posts with label tutorial. Show all posts
Wednesday, 17 February 2016
Monday, 7 November 2011
Quilt As You Go Tutorial
I promised you a tutorial on the little 'quilt as you go' piece we did at the Region 10 Quilters' Guild Area Day a couple of weeks ago, so here it is:
This is the sample piece I made on the day:
and this is how it was done:
To make one block you need
4 x 6" squares of fabric, two contrasting or complementary fabrics are nice
1 x 7.5" square of wadding
Sewing and quilting threads
1. Join the four squares of fabric to make a 11.5" square
2. Place the wadding on the wrong side, positioning it on the diagonal in the middle of the block. Secure it in place, either with a few stitches at each corner or with a squirt of 505.
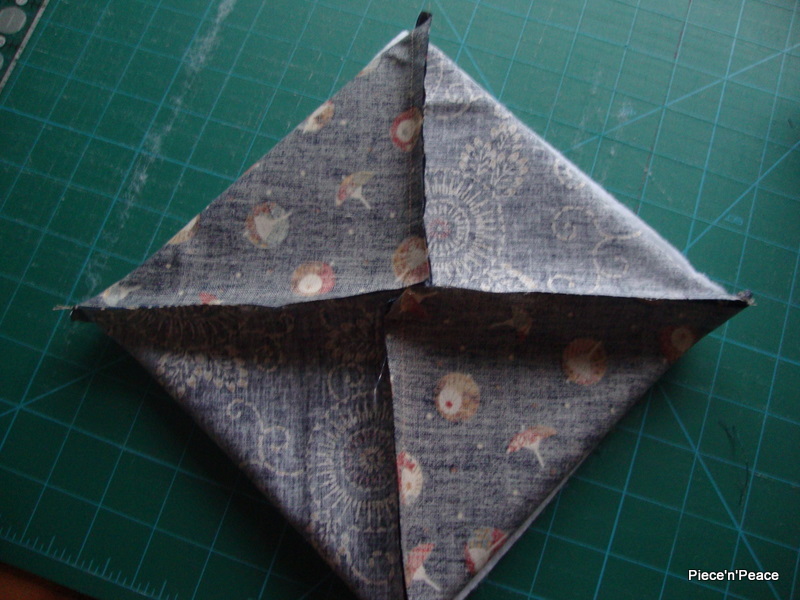
3. Fold in half, rightsides together and stitch the short ends.
4. Open out and line the long sides up. Stitch together, leaving a small gap to turn the block out. NB don't leave the gap at one of the ends as it will be more difficult to keep the corners neat.
5. Turn through the block, ensuring the corners are pulled out and then handstitch the gap closed.
6. Press and "quilt as desired".
You can make a quilt with these blocks and it will be all finished, wadding, backing and all as soon as you've joined the blocks. I just made a single block and decorated it with sashiko stitching and tassels to make a pretty little mug rug, although, with the Japanese theme I had to have a pretty tea cup and saucer on mine.
This is the sample piece I made on the day:
and this is how it was done:
To make one block you need
4 x 6" squares of fabric, two contrasting or complementary fabrics are nice
1 x 7.5" square of wadding
Sewing and quilting threads
1. Join the four squares of fabric to make a 11.5" square
2. Place the wadding on the wrong side, positioning it on the diagonal in the middle of the block. Secure it in place, either with a few stitches at each corner or with a squirt of 505.
3. Fold in half, rightsides together and stitch the short ends.
4. Open out and line the long sides up. Stitch together, leaving a small gap to turn the block out. NB don't leave the gap at one of the ends as it will be more difficult to keep the corners neat.
5. Turn through the block, ensuring the corners are pulled out and then handstitch the gap closed.
6. Press and "quilt as desired".
You can make a quilt with these blocks and it will be all finished, wadding, backing and all as soon as you've joined the blocks. I just made a single block and decorated it with sashiko stitching and tassels to make a pretty little mug rug, although, with the Japanese theme I had to have a pretty tea cup and saucer on mine.
Tuesday, 21 June 2011
Twin Needle Tutorial and More
Many of you have asked me to share the twin needle method of attaching bias tape. This was taught to us at the "Vistas of Japan" workshop by Gail Lawther. In her books and pattern packs she shares some ideas for attaching the bias tape with ordinary stitching and also with decorative embroidery stitches.
Now straight is the keyword here, applying the bias tape in curved lines is what is naturally wants to do, being bias tape.
Applying it straight takes a bit of practice -
stop and raise the needle. Then turn your work a little, keeping the needle on the inner side of the turn in the same place,
then take another stitch and repeat until you're on the straight again. Gail described it as being like those marching bands at tattoos where the people on the outside end of the line have to run while those at the inside end just march on the spot and the whole line revolves. Does that help?
Practise and have fun, I think this stained glass method could be appearing quite a lot in my work.
Thanks Gail.
Clover fusible bias tape is a horrific price in UK. You can make you own (yeah right) or you can get a friend who's visiting USA to bring some back. I'm trying to find a reasonably priced source....any suggestions?
I also want to show off my lovely cherry blossoms that I've added to my Mount Fuji quiltlet.
The flowers are a development of the Suffolk Puff (or yo-yo as it's now commonly called) with the puff pulled in towards the centre several times and then a scattering of beads added in the middle, cute eh? This quilt is nearly all done now (I hope I'll get it backed and bound at quilting group on Friday) and I'm pleased with it. I'm intending to make another of Gail's patterns in the Japanese series, possibly the Japanese Sand Garden.
British P&Q magazine have recently started a blog and are planning to have some special quilty goodness in cyberspace. There will be blog buttons for all those talented bloggers out there who produce such wonderful material that is featured in the magazine....that's you Lynne and you Trudi....wow I have such star connections, or who blog about articles they have liked or prizes they have won. There'll be some special blog giveaways - please spread the word and watch this space! Look out in the magazine too for hints when you need to check out the FB page!
Finally for today, here's the quilt I'm making for the BritQuilt Swap - I hope this will be finished on Friday too, it's due in the post at the beginning of July. It has been very interesting for me to work with these fabrics which aren't "mine" at all but I have had some praise for the quiltlet and hope my partner in the swap will like it (or at least be kind).
That's all for today, I'm off to watch Wimbledon.
- Twin needles are available in a variety of widths and the important thing is to get the right width for the bias tape you'll be using. With Gail we used quarter inch fusible bias tape (from Clover) and a 4/80 twin needle and stitched with a very small zigzag. This created a pleasing slightly raised faux trapunto effect.
- The twin needle goes in your machine just like an ordinary needle and then you need two reels of cotton of the same colour and weight (or of different colours of course, more room for experimentation). Most machines have additional spool pins for this but if your doesn't wind two bobbins with thread and put them on your spool pin with the threads going in opposite directions.
- Thread the machine almost as usual, check your manual. With mine I need to omit the last thread guide with one thread. With some machines it is possible to thread either side of the tension discs.
- Use a presser foot that allows you to see where you're going! My machine says use the plastic T foot.
- Then carefully try the machine out, not by pressing the foot pedal but rather by gently turning the handle. If nothing crunches you're good to go - on a practice piece first.
Now straight is the keyword here, applying the bias tape in curved lines is what is naturally wants to do, being bias tape.
Applying it straight takes a bit of practice -
- press with the tip of the iron at the beginning and then at the end of the line you're following and then press between those points.
- When you reach a fold (and make sure you are sewing so that the folds have their "back" to the needle so that the presser foot doesn't nestle in the fold),
stop and raise the needle. Then turn your work a little, keeping the needle on the inner side of the turn in the same place,
then take another stitch and repeat until you're on the straight again. Gail described it as being like those marching bands at tattoos where the people on the outside end of the line have to run while those at the inside end just march on the spot and the whole line revolves. Does that help?
Practise and have fun, I think this stained glass method could be appearing quite a lot in my work.
Thanks Gail.
Clover fusible bias tape is a horrific price in UK. You can make you own (yeah right) or you can get a friend who's visiting USA to bring some back. I'm trying to find a reasonably priced source....any suggestions?
I also want to show off my lovely cherry blossoms that I've added to my Mount Fuji quiltlet.
The flowers are a development of the Suffolk Puff (or yo-yo as it's now commonly called) with the puff pulled in towards the centre several times and then a scattering of beads added in the middle, cute eh? This quilt is nearly all done now (I hope I'll get it backed and bound at quilting group on Friday) and I'm pleased with it. I'm intending to make another of Gail's patterns in the Japanese series, possibly the Japanese Sand Garden.
British P&Q magazine have recently started a blog and are planning to have some special quilty goodness in cyberspace. There will be blog buttons for all those talented bloggers out there who produce such wonderful material that is featured in the magazine....that's you Lynne and you Trudi....wow I have such star connections, or who blog about articles they have liked or prizes they have won. There'll be some special blog giveaways - please spread the word and watch this space! Look out in the magazine too for hints when you need to check out the FB page!
Finally for today, here's the quilt I'm making for the BritQuilt Swap - I hope this will be finished on Friday too, it's due in the post at the beginning of July. It has been very interesting for me to work with these fabrics which aren't "mine" at all but I have had some praise for the quiltlet and hope my partner in the swap will like it (or at least be kind).
That's all for today, I'm off to watch Wimbledon.
Sunday, 17 April 2011
Fabric Postcards for Easter
I thought I'd give you a break from my reports on the QGBI Conference and show you what I've been making. This is a set of fabric postcards for the BQLPC Easter swap and I'm quite pleased with them. I love the way a set of cards looks when put together as a patchwork too - must put something similar on my to do list!
The design is based on a stained glass window I photographed when I was in Jerusalem with DS in 2009. I always thought I would translate it into a fabric project and these Easter cards seemed ideal.
I tried to make the colours using fabric crayons and adding lace for texture but wasn't very happy with my first attempt:
so I raided my stash for a brilliant blue fabric, a batik and also a gold metallic fabric for a bit of additional texture. NB There's an article by Chris Hammacott in this month's British Patchwork and Quilting magazine about texture in patchwork, very interesting.
Here's a quick "how I did it" in photos:
The design is based on a stained glass window I photographed when I was in Jerusalem with DS in 2009. I always thought I would translate it into a fabric project and these Easter cards seemed ideal.
I tried to make the colours using fabric crayons and adding lace for texture but wasn't very happy with my first attempt:
so I raided my stash for a brilliant blue fabric, a batik and also a gold metallic fabric for a bit of additional texture. NB There's an article by Chris Hammacott in this month's British Patchwork and Quilting magazine about texture in patchwork, very interesting.
Here's a quick "how I did it" in photos:
Mark the design on the background fabric in pencil
Mark the lines with a Hera marker onto the fabric to be applied (below the background)
Cut just beyond the marked lines
Position the pieces and attach with fabric glue or bondaweb
Pin bias tape into place around the awkward bits and iron into position
Add the rest of the bias tape, iron to hold and then stitch it all in place
(preferably while sitting outside in the sunshine as I was able to)
I backed the cards with calico and pelmet vilene,
cut them to size
and machine buttonhole stitched around the outside.
I couldn't manage the Hebrew text from the window
so added the words "Alleluia" in Pigma pen and
voila!
I've been alternating making these cards with short sessions in the garden today. It's been so glorious and the weeds seem to be growing at a massive rate. I sat and pulled the weeds and moss out of the cracks in the patio and then DH and I had lunch - including yummy asparagus and herbs from the garden -outside on a very tidy patio and admired our work, bliss. I hope you've all had a good weekend too.
Wednesday, 15 December 2010
Swaps and Surprises
I enjoyed my craft group's Christmas meeting today although we were low on numbers due to illness and probably the persisting icy roads. Those of us who made it enjoyed very little stitching, lots of lovely chatting and some very yummy things to eat. I'd been idle and bought a tin of Italian biscuits from John Lewis (but they were delicious and now I have a pretty festive tin for putting things in) but have to congratulate Anne who made the most wonderful meringues, sandwiched together with fresh cream. Crisp on the outside, soft and sticky on the inside and no calories in them at all. In the little time we did spend with needles in our hands instead of sweet, sticky things I worked on bonnets.
I haven't made many new Christmas decorations this year although there are lots of lovely ideas on the blogs I follow. I've added to last year's, which you can see at Christmas decoration tutorial , with the festive fabric postcards I've been receiving from BQLPC members. The theme is "A Touch of Bling" and all these glittering, sparkling cards are making a wonderful display over the fireplace.
Today I was tempted by Catherine's button wreath and so I thought I'd make one, it's working out well and when I've added the bows I'm going to hang above the mirror in the sitting room. Thanks Catherine.
I've been enjoying receiving fabric postcards, Christmas swap blocks and some wonderful goody bags from quilting friends, what wonderful gifts from people with the sameaffliction addiction obsession as me, thank you, you lovely people. In parcels I send I also like to include something I've made. Last year my friends received a fabric Christmas decoration, this year I've been creating kanzashi. These are folded fabric flowers and are a delight to make - although mine are a little uneven - still, practice will make perfect.
It's Friday Night Sew In part 2 this week and I'm planning to be quilting. I keep putting off starting on quilting my daughter's quilt and really must do it. I'm telling you so that you can nag me! It's not too late to join in on Friday, sign up by clicking in the logo on the right, you'll be very welcome.
I haven't made many new Christmas decorations this year although there are lots of lovely ideas on the blogs I follow. I've added to last year's, which you can see at Christmas decoration tutorial , with the festive fabric postcards I've been receiving from BQLPC members. The theme is "A Touch of Bling" and all these glittering, sparkling cards are making a wonderful display over the fireplace.
Today I was tempted by Catherine's button wreath and so I thought I'd make one, it's working out well and when I've added the bows I'm going to hang above the mirror in the sitting room. Thanks Catherine.
I've been enjoying receiving fabric postcards, Christmas swap blocks and some wonderful goody bags from quilting friends, what wonderful gifts from people with the same
It's Friday Night Sew In part 2 this week and I'm planning to be quilting. I keep putting off starting on quilting my daughter's quilt and really must do it. I'm telling you so that you can nag me! It's not too late to join in on Friday, sign up by clicking in the logo on the right, you'll be very welcome.
Sunday, 10 October 2010
Dragonfly In Blowing Grasses - Sashiko Tutorial Finished
I am very grateful to Susan Briscoe for her comments on the sashiko I am doing at the moment.
I tried using the order of stitching that she explained and found I preferred it. I enjoyed a better rhythm in my stitching and doing the whole motif in one go rather than returning to do the grasses felt right. I also had shorter jumps across the back of the work.
Mind you, as Susan said, if I'd wanted to do the grasses in a contrasting colour it would have been better to use the original order of stitching.
If you have done this dragonfly over blowing grasses piece I would love to hear how you got on. Susan Fletcher is planning to offer two more dragonfly designs in the near future. Will you be using them all together in a quilt or are you making a set of table mats (there are instructions in her tutorial newsletter for this), or do you have other plans for your sashiko dragonflies?
I hardly dare post a picture of my finished piece. I realised that my dragonfly would be facing the opposite way to Susan Fletcher's original design unless I transferred the image to the "sticky" side of the vilene and decided that I was quite happy with that. What didn't occur to me at all was that the grasses would be blowing in the wrong direction.
Now I'm going to point out that the prevailing winds in Lincolnshire blow from a different direction from those in Japan (probably) and therefore my nowaki are giving my sashiko a locational reference. Hmm, what do you think?
It has made my mind up for me about transferring the design to the back of the work in future. I'm going to investigate marking pencils/pens and work from the front on subsequent sashiko projects. Lovely little design though, thanks Susan at Alderspring Designs.
I tried using the order of stitching that she explained and found I preferred it. I enjoyed a better rhythm in my stitching and doing the whole motif in one go rather than returning to do the grasses felt right. I also had shorter jumps across the back of the work.
Mind you, as Susan said, if I'd wanted to do the grasses in a contrasting colour it would have been better to use the original order of stitching.
If you have done this dragonfly over blowing grasses piece I would love to hear how you got on. Susan Fletcher is planning to offer two more dragonfly designs in the near future. Will you be using them all together in a quilt or are you making a set of table mats (there are instructions in her tutorial newsletter for this), or do you have other plans for your sashiko dragonflies?
I hardly dare post a picture of my finished piece. I realised that my dragonfly would be facing the opposite way to Susan Fletcher's original design unless I transferred the image to the "sticky" side of the vilene and decided that I was quite happy with that. What didn't occur to me at all was that the grasses would be blowing in the wrong direction.
Now I'm going to point out that the prevailing winds in Lincolnshire blow from a different direction from those in Japan (probably) and therefore my nowaki are giving my sashiko a locational reference. Hmm, what do you think?
It has made my mind up for me about transferring the design to the back of the work in future. I'm going to investigate marking pencils/pens and work from the front on subsequent sashiko projects. Lovely little design though, thanks Susan at Alderspring Designs.
Wednesday, 6 October 2010
The Order of Stitching
If you are receiving Susan Fletcher's email tutorials for this project you will have all this information (and a lot more besides) but here are her instructions for establishing the order of stitching a sashiko design.
When stitching a sashiko design we need to think about the order of stitching. By stitching in the right order we will not waste any precious thread, or waste time, and we will be able to get into a good rhythm and keep our stitches even.
This usually means identifying the continuous lines within a design and following those rather than stitching motifs individually. With this design the first thing to stitch is the line of curves from one side of the design to the other.
So I completed all the horizontal curved lines first:
Note the small loops of thread left when changing direction, these prevent the stitching becoming too taut and possibly gathered up.
If it is not possible to stitch in long lines then we need to make the jumps between stitches as short as possible. Generally speaking, if it takes less thread to cast off and cast on again at the next point then that is what we should do.
With the blowing grasses pattern the next stage in the order of stitching is the small grasses and we can see that they form a diagonal pattern of their own and this is the order in which we stitch.
When stitching a sashiko design we need to think about the order of stitching. By stitching in the right order we will not waste any precious thread, or waste time, and we will be able to get into a good rhythm and keep our stitches even.
This usually means identifying the continuous lines within a design and following those rather than stitching motifs individually. With this design the first thing to stitch is the line of curves from one side of the design to the other.
So I completed all the horizontal curved lines first:
Note the small loops of thread left when changing direction, these prevent the stitching becoming too taut and possibly gathered up.
If it is not possible to stitch in long lines then we need to make the jumps between stitches as short as possible. Generally speaking, if it takes less thread to cast off and cast on again at the next point then that is what we should do.
With the blowing grasses pattern the next stage in the order of stitching is the small grasses and we can see that they form a diagonal pattern of their own and this is the order in which we stitch.
Tuesday, 5 October 2010
Dragonfly In Blowing Grasses - Getting Started
I've got my Dragonfly in Blowing Grasses marked up ready for stitching.
I used an ordinary permanent marker to trace the design - the kind that comes with a packet of labels for ironing onto children's school uniform - it does the job. The last thing we want is for the ink to transfer to the white thread. I'm using DMC Coton Perle in weight 8 by the way.
I'm still not sure I like this method of transferring the design to the back of the work but do like the way the interfacing supports the sashiko fabric. I think for my next piece I will use interfacing on the back and mark the design on the front.
I have a meeting of Crafty Time Out tomorrow (the first one I've been to for some time after my spell in hospital) so I'll take my sashiko with me and should be able to make a good start if I don't chat too much.
So, here goes. If you want to join in with Susan's second tutorial the details are here.
I used an ordinary permanent marker to trace the design - the kind that comes with a packet of labels for ironing onto children's school uniform - it does the job. The last thing we want is for the ink to transfer to the white thread. I'm using DMC Coton Perle in weight 8 by the way.
I'm still not sure I like this method of transferring the design to the back of the work but do like the way the interfacing supports the sashiko fabric. I think for my next piece I will use interfacing on the back and mark the design on the front.
I have a meeting of Crafty Time Out tomorrow (the first one I've been to for some time after my spell in hospital) so I'll take my sashiko with me and should be able to make a good start if I don't chat too much.
So, here goes. If you want to join in with Susan's second tutorial the details are here.
Tuesday, 28 September 2010
Second Sashiko Tutorial
Susan Fletcher's new sashiko project, Dragonfly in Blowing Grasses, starts today, hopefully you have received your instructions by email newsletter and have all your supplies ready. If you just want the pattern you can buy it as a downloadable PDF from the website.
I'm off to transfer the design to the interfacing. I'm hoping to find something just the right size for drawing all those semi-circles rather than tracing them freehand. Then I'll share what I've done. Have fun.
Saturday, 24 July 2010
Friday Night Sew-In: Saturday Morning Report, July
I had quite a varied Friday Night Sew-In last night, flitting about and doing lots of different stitch-related things.
Firstly I finished this sashiko project which you can read more about at Sashiko Started It. It's an online tutorial from Susan Fletcher at Sashiko Stitchers and has been great fun.
I then put my needle down and spent an hour or sew catching up with all your wonderful quilty blogs. I love reading what you are all doing, both quilt-wise and in other areas of your lives. I find such inspiration and support from fellow bloggers.
Back to the fabric and I worked on my 'Blush' wavy four-patch for a while and then made three fabric postcards. There will be photos soon.
I was very good on the nice things to eat front. As it's so warm and summery here I resisted the chocolately things and snacked on a bowl of gorgeous dark red cherries from Kent, delicious.
This morning I discovered I am a winner in Abbey Lane Quilts' gorgeous giveaway so I'm doing a happy floral dance.
Thanks Heidi and Bobbi for hosting another great FNSI. Looking forward to seeing what you all got up to.
Saturday, 17 July 2010
Sashiko Online Tutorial 3
My 'diamond waves' are coming along quite nicely and I'm feeling really relaxed while I stitch. If I want to get stressed I could worry that my junctions are not consistent. Sometimes I have a T-junction and sometimes there's a space. All in all I'm quite happy though and while I was stitching (is there such a word as "sashikoing" I wonder )and my mind was wandering, I started to think about beads. Susan has mentioned that we might add beads...
So here are some I am considering:
Not the best photo but it is good enough to see how a scattering of seaspray beading would look above the diamond waves. The crystals are sadly too large as I love the way they reflect the light. At the moment I'm thinking I'll either use the clear glass, silver lined beads (top right) or the square glass irridescent beads (bottom centre). What do you think?
I am also wondering whether I would like to stitch my dragonfly in a variegated thread. I'm using DMC no.8 coton perle in white for the waves. I prefer this to the "proper" sashiko cotton from Olympus as I like the sheen it has and I also find it sews more smoothly. Maybe a variegated dragonfly would be over egging this lovely design...
The most important thing I have learned with today's sashikoing is to leave those little loops of extra thread when I change stitching direction, it is amazing how quickly they get taken up as I smooth my work out. Without those loops my waves would be all puckered up.
So here are some I am considering:
Not the best photo but it is good enough to see how a scattering of seaspray beading would look above the diamond waves. The crystals are sadly too large as I love the way they reflect the light. At the moment I'm thinking I'll either use the clear glass, silver lined beads (top right) or the square glass irridescent beads (bottom centre). What do you think?
I am also wondering whether I would like to stitch my dragonfly in a variegated thread. I'm using DMC no.8 coton perle in white for the waves. I prefer this to the "proper" sashiko cotton from Olympus as I like the sheen it has and I also find it sews more smoothly. Maybe a variegated dragonfly would be over egging this lovely design...
The most important thing I have learned with today's sashikoing is to leave those little loops of extra thread when I change stitching direction, it is amazing how quickly they get taken up as I smooth my work out. Without those loops my waves would be all puckered up.
Labels:
dragon over diamond waves,
s,
Sashiko,
threads,
tutorial
Sashiko Online Tutorial 2
How are you all getting on? I think Susan's tutorials are very detailed, the photos are so useful and I'm really enjoying the extra information about the history of sashiko that she's giving us. In the third tutorial Susan discusses thimbles so, just for fun, I've added a little poll to the right hand bar of my blog.
I've stitched my border:
the back,
with that little extra loop left on the corner to prevent puckering - a really good tip, after stitching carefully to make the corners right the last thing we want is for it to be pulled out of alignment.
The front,
and I have to admit to finding it difficult to work from the back. I kept forgetting the small stitch should be on the back (front, where I was working) and the large on the front (back, where I couldn't see). I'm starting to get used to it though and certainly finding the support of the interfacing very helpful. My stitch lengths vary but I'm hanging on to Sue's comment that
We've got all weekend to stitch the diagonal lines on the 'dragonfly over diamond waves' design and by the time we get the next tutorial and start on the dragonfly I think I'll be very happy with my stitching - practice makes perfect after all. Have a lovely weekend and I'm looking forward to hearing from you all.
I've stitched my border:
the back,
with that little extra loop left on the corner to prevent puckering - a really good tip, after stitching carefully to make the corners right the last thing we want is for it to be pulled out of alignment.
The front,
and I have to admit to finding it difficult to work from the back. I kept forgetting the small stitch should be on the back (front, where I was working) and the large on the front (back, where I couldn't see). I'm starting to get used to it though and certainly finding the support of the interfacing very helpful. My stitch lengths vary but I'm hanging on to Sue's comment that
We've got all weekend to stitch the diagonal lines on the 'dragonfly over diamond waves' design and by the time we get the next tutorial and start on the dragonfly I think I'll be very happy with my stitching - practice makes perfect after all. Have a lovely weekend and I'm looking forward to hearing from you all.
Thursday, 15 July 2010
Sashiko Online Tutorial 1
I didn't order the whole "Dragon Over Diamond Waves" kit from Susan as I have most of the equipment for the project already. Then, when I read the email that came yesterday with the first part of the tutorial I realised that I didn't have the pattern! I contacted Susan by email who quickly added a download option to her website and within a short while I had a .pdf winging its little way through cyberspace and into my laptop! Clever eh?
This is already proving to be an interesting tutorial as Susan instructed us to trace the pattern onto interfacing and then iron it to the back of our sashiko fabric. Previously I have marked the fabric directly with a white pen. For this method I used a permanent black marker - the kind I use for writing quilt labels (or used to use for writing names in my children's school kit, although things still vanished into the bottomless pit that is either the lost property box or their bedrooms). By using a permanent ink I'm hoping it won't rub off on the white thread and make a mess of my sashiko.
My dragonfly seems to be the opposite way around to the illustration on the tutorial email, not that it really matters but I keep reading through and don't think I've gone wrong already. I'm waiting now for tutorial two and itching to get stitching!
This is already proving to be an interesting tutorial as Susan instructed us to trace the pattern onto interfacing and then iron it to the back of our sashiko fabric. Previously I have marked the fabric directly with a white pen. For this method I used a permanent black marker - the kind I use for writing quilt labels (or used to use for writing names in my children's school kit, although things still vanished into the bottomless pit that is either the lost property box or their bedrooms). By using a permanent ink I'm hoping it won't rub off on the white thread and make a mess of my sashiko.
My dragonfly seems to be the opposite way around to the illustration on the tutorial email, not that it really matters but I keep reading through and don't think I've gone wrong already. I'm waiting now for tutorial two and itching to get stitching!
Sunday, 11 July 2010
Sashiko Online Tutorial
Have you got all your materials together for Sue's sashiko online class? This is what we need and the class starts on Wednesday. The step by step tutorial comes in a course of emails.
So far Teresa, Patchwork Rose, and Jenni will be sashiko-ing along with Sue and me (and lots of other people signed up to the Sashiko Stitcher Newsletter). It's not too late to sign up here with us or with Sue. Read here for all the information.
the materials list:
-22 x 16 inch piece of 100% cotton, navy or indigo blue
-12 x 18 inches white lightweight fusible interfacing
-#5 perle cotton thread or sashiko thread
-sashiko needle
-thimble (optional)
-seed beads and bead needle (optional)
-scissors, iron, ruler and a dark color fine tip permanent fabric marking pen
As well as the tutorial Sue promises some history and tidbits too, should be fun. See you on Wednesday.
So far Teresa, Patchwork Rose, and Jenni will be sashiko-ing along with Sue and me (and lots of other people signed up to the Sashiko Stitcher Newsletter). It's not too late to sign up here with us or with Sue. Read here for all the information.
the materials list:
-22 x 16 inch piece of 100% cotton, navy or indigo blue
-12 x 18 inches white lightweight fusible interfacing
-#5 perle cotton thread or sashiko thread
-sashiko needle
-thimble (optional)
-seed beads and bead needle (optional)
-scissors, iron, ruler and a dark color fine tip permanent fabric marking pen
As well as the tutorial Sue promises some history and tidbits too, should be fun. See you on Wednesday.
Thursday, 8 July 2010
Wavy Four Patch Tutorial
At Magie Relph's workshop on 4th June we looked at various types of wiggly blocks that she had created in addition to the nine-patch we were to be working on. Here are some of Magie's wavy four-patches:
In these first blocks a scrappy look has been created by using a plain fabric and a variety of contrasting fabrics.
In this example Magie has used a contrast in colour to show off the design, and has also made her cuts diagonally to create an extra tiddly version of Drunkard's Path.
In this block, my favourite, Magie has used only one contrasting fabric to three pieces of the plain fabric and arranged the patches to create a variation on a pinwheel.
Finally here's Magie's totally wayward 25-patch showing a contrast of both colour and fabric design. The possibilities are endless and such fun.
Several people have kindly asked me to share a wavy-patch tutorial and so, all credit to Magie Relph of course, here comes my third tutorial (the first was on wavy seams which might be helpful with this project and the second was my Christmas decoration tutorial ).
Firstly we need to get our fabrics together so here are a few guidelines, whether you're buying new or raiding your stash.
Fabric Choices
It is really important to choose fabrics that contrast well.
You could have a colour contrast, like my red batik and Japanese print nine-patch version,
or a design contrast - maybe a plain and a stripe for example. What you don't want is two similar fabrics, two spriggy, floral prints will absorb the wavy edges of the fabric pieces and just look like a wild cottage garden - very nice but not what we're trying to achieve here!
You then need to decide on the balance of fabrics.
Your four patch can be made up of two fabrics in a 2+2 design or in a 1+3 design, like the blue batik example above or your could have a plain fabric and a variety of contrasting fabrics to create a "scrappy" look, like the first sample above.
You could draw some squares and have fun with the colouring pencils
or, my preferred "design method" is to rip some pages out of a colour supplement or magazine and use them as "fabric" to try out some ideas.
I thought it would be a lovely idea to use a charm pack to create an interesting, but simple, four-patch design and that it would show off the fabrics beautifully and, as fortune would have it, I happened to have a £10 loyalty voucher for my LQS, Sew Creative at Wroxham Barns. I wanted something a little different (for me) and chose a charm pack in Moda's Blush design by Basic Grey, all gorgeous soft pinks and turquoises with some lovely brown and rust accents. I also bought some Boutique by Chez Moi for Moda to go with it.
Equipment
I hope I'm making myself clear. Let's get started, a picture is worth a thousand words.
I'm going to do all the blocks in this arrangement and then join them together without sashing, I'll post a picture when it's done and in the meantime I hope you'll try this fun way of piecing and have a break from your ruler.
In these first blocks a scrappy look has been created by using a plain fabric and a variety of contrasting fabrics.
In this example Magie has used a contrast in colour to show off the design, and has also made her cuts diagonally to create an extra tiddly version of Drunkard's Path.
In this block, my favourite, Magie has used only one contrasting fabric to three pieces of the plain fabric and arranged the patches to create a variation on a pinwheel.
Finally here's Magie's totally wayward 25-patch showing a contrast of both colour and fabric design. The possibilities are endless and such fun.
Several people have kindly asked me to share a wavy-patch tutorial and so, all credit to Magie Relph of course, here comes my third tutorial (the first was on wavy seams which might be helpful with this project and the second was my Christmas decoration tutorial ).
WAVY FOUR-PATCH TUTORIAL
Firstly we need to get our fabrics together so here are a few guidelines, whether you're buying new or raiding your stash.
Fabric Choices
It is really important to choose fabrics that contrast well.
You could have a colour contrast, like my red batik and Japanese print nine-patch version,
or a design contrast - maybe a plain and a stripe for example. What you don't want is two similar fabrics, two spriggy, floral prints will absorb the wavy edges of the fabric pieces and just look like a wild cottage garden - very nice but not what we're trying to achieve here!
You then need to decide on the balance of fabrics.
Your four patch can be made up of two fabrics in a 2+2 design or in a 1+3 design, like the blue batik example above or your could have a plain fabric and a variety of contrasting fabrics to create a "scrappy" look, like the first sample above.
You could draw some squares and have fun with the colouring pencils
or, my preferred "design method" is to rip some pages out of a colour supplement or magazine and use them as "fabric" to try out some ideas.
I thought it would be a lovely idea to use a charm pack to create an interesting, but simple, four-patch design and that it would show off the fabrics beautifully and, as fortune would have it, I happened to have a £10 loyalty voucher for my LQS, Sew Creative at Wroxham Barns. I wanted something a little different (for me) and chose a charm pack in Moda's Blush design by Basic Grey, all gorgeous soft pinks and turquoises with some lovely brown and rust accents. I also bought some Boutique by Chez Moi for Moda to go with it.
- I have decided to try a 1+3 design which means I will need one 5" square from the charm pack plus three 5" squares cut from my contrasting fabric, in my case the Boutique.
- If you go for 2+2 you will need two 5" squares of each fabric to start with.
- If you are going for scrappy you will need two plain 5" squares and two patterned 5" squares.
Equipment
- A cutting board
- A very sharp rotary cutter - you need to have a new blade to ensure the fabric cuts smoothly, especially for the second cut when you go through a stitched seam.
I hope I'm making myself clear. Let's get started, a picture is worth a thousand words.
- Stack your four approximately 5" squares all right side up.
- Use a sharp rotary cutter to cut through all four layers in a gentle curve from top to bottom. This cut should be approximately across the middle of the squares.
- Pair your half squares, matching the curves.
- Sew each pair together, right sides together, gently matching the curve as you go. A seam a little less than 1/4" works best. I don't find it necessary to use pins on short seams like these but try not to pull the fabric, go one stitch at a time if necessary to match the curve perfectly. I match the beginning of the seam and then hold the fabric with one piece in each hand, between my thumb and index finger to match it as I sew. With a little practising this works well.
- Press the seam to the side it wants to go. If one fabric is much lighter and you need to press to the darker side, a little steam is helpful.
- Pile your four new pieces right sides up and matching the seams and then cut them in half again, with a similar gentle curve to last time, approximately in the middle of the square.
- You then lay out your new pieces and match the curves again. Stitching the curved seams as before (and not worrying about matching the joins, they won't match anyway). The more observant among you will notice the threads, stitch holes and folds on these pieces. I paired them incorrectly, stitched them beautifully, pressed them...and then when I came to take the photo realised I'd got it wrong, oops!
- Then make sure you layout is as you want it and stitch the blocks together first in pairs and then into four. You will need to fit them together comfortably but be aware that they won't match up as some curved seams take up more fabric than others. It will all come out in the end ;)
I'm going to do all the blocks in this arrangement and then join them together without sashing, I'll post a picture when it's done and in the meantime I hope you'll try this fun way of piecing and have a break from your ruler.
Subscribe to:
Posts (Atom)